The Quench
Yaki-ire is the crux of the craft: the smith paints the blade with clay — thick over the spine and body, feather-thin along the edge — heats it evenly to about 800 °C, judging temperature purely by the steel's glow in a darkened smithy, and plunges it into water. The bare edge cools in a blink and transforms into martensite, a steel structure so hard it holds a razor edge; the clay-blanketed spine cools slowly and stays tough. The boundary between the two becomes the hamon, and because martensite occupies more volume than the structure it replaces, the edge expands and bows the blade into its final curve. It is the one irreversible step: a crack here scraps months of work, the failure rate rises with the ambition of the hamon, and even masters lose blades to it.
Prerequisites: Geometry and Construction — the blade arrives here shaped, straight, and unhardened. Feeds problems: surviving the quench, hard enough to cut, tough enough to survive, controlling invisible carbon
Practitioner
Recall the physics you already have: steel’s hardness is set by how fast it cools from red heat. Cool high-carbon steel slowly and the carbon settles into soft, tough structures (pearlite); cool it fast enough and the carbon gets trapped in a distorted, glass-hard crystal called martensite. One piece of steel, two possible destinies, selected purely by cooling rate. The quench weaponizes this: engineer different cooling rates at different places on the same blade, and you get a hard edge and a tough spine in one piece of steel — the thermal half of the hard-but-tough answer, completing the structural half from the last topic.
The cooling-rate control is a clay jacket. The smith mixes clay with charcoal powder and ground stone — every smith’s recipe is his own — and paints the blade (tsuchioki): a thick blanket over spine and body, a feather-thin wash along the edge. Thin clay is not “no clay,” counterintuitively — a thin layer actually speeds cooling past bare steel by defeating the vapor blanket that forms around hot metal in water. The edge of the thick clay is worked into a designed profile — this line drafts the future hamon — and the smith adds narrow ribs of clay running down across the edge zone: ashi, “legs.” They print soft interruptions into the hardened band so that if the edge ever chips or cracks in use, the damage stops at the next soft line instead of running down the blade. Crack arrest, painted on by hand.
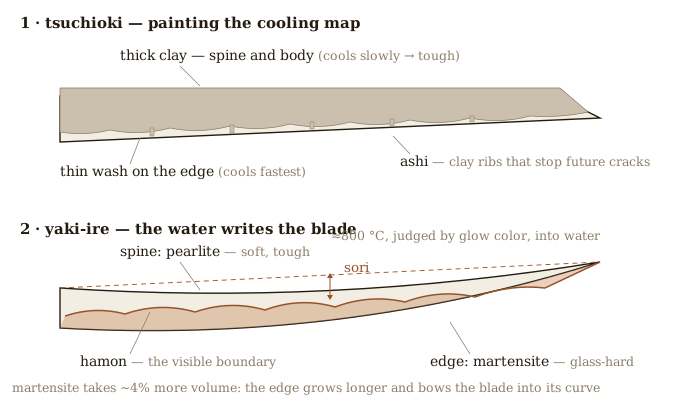
Then the moment. The forge is darkened — often literally at night — because glow color is the only thermometer, and ambient light corrupts it. The smith works the blade evenly up to roughly 750–800 °C, a color tradition describes as “the moon in February.” Too cool and the edge won’t harden; too hot and the steel’s grain coarsens and the crack risk soars. The water trough waits at a temperature the smith controls carefully and traditionally keeps secret. The blade goes in edge-first with a decisive sweep. Steam explodes. In the first second, the bare edge crashes through the transformation and becomes martensite; under the clay, the spine cools gently into pearlite over the following seconds.
Two extraordinary things happen inside that second. First, the hamon is born: the boundary between martensite and pearlite, following the clay line the smith drew — but textured by everything else, because the crystal size at the boundary depends on exact temperatures. Quench hotter and you get coarse, individually visible crystals (nie) glittering along the line; cooler gives a fine mist (nioi). The smith drew the hamon’s shape, but its character emerges from the physics — which is why no two are alike and why appraisers trust it as evidence. Second, the sori: martensite occupies about 4% more volume than the structure it replaces, so the edge suddenly gets longer than the spine. The blade — forged straight — visibly moves in the trough, dipping edge-ward and then bowing away as the edge expands, and comes out curved. The signature curve of the Japanese sword is not carved or forged; it is a residual-stress diagram you can see. Those same locked-in stresses also pre-compress the edge, helping it resist cracks in use — and they are exactly what can crack the blade in the trough. A hairline crack across the hardened zone — hagire — is a death sentence discovered minutes or weeks later.
The aftermath is quieter: the blade is reheated gently to around 150–180 °C (yaki-modoshi, tempering) to let the most brittle martensite relax slightly, trading a whisper of hardness for a real gain in crack resistance. The smith corrects the curvature if needed — pressing against a hot copper block to adjust sori — does the rough foundation grinding, cuts the file-mark pattern into the tang, and chisels the signature. Then the blade leaves for a different profession entirely: the polisher.
Expert pointers
The instrumented-craft frontier is here: thermocouple and high-speed-video studies of master smiths quenching, residual-stress mapping of finished blades by neutron diffraction, and simulation work reconstructing what combinations of clay, temperature, and water reproduce historical hamon. The great open puzzle is utsuri — the ghostly hardening shadow above the hamon on classic Bizen work — which resisted reproduction for most of a century; a few modern smiths now produce convincing utsuri, and the mechanism (incomplete transformation products in a band of intermediate cooling) is still being argued in papers. Also live: water versus oil (oil is gentler, safer, and produces a duller hamon — some wartime and budget blades used it; art-sword orthodoxy stays with water), and how far a smith can design nie placement versus cultivate the conditions and accept what emerges.
Misconceptions
- “The hamon is decoration — etched, polished, or painted on.” On a real blade the hamon is a three-dimensional boundary between crystal structures, running through the steel’s thickness. Machine-made replicas fake the look with acid or abrasive wheels; the fake has no depth, no crystals, and vanishes under repolishing, which is one of the first things authentication checks.
- “The curve is the smith’s hammer work.” Mostly the quench’s work. The smith aims for it — clay layout, edge thickness, and construction all bias how much sori the quench will add — but the transformation delivers it. Smiths then fine-tune curvature afterward, hot.
- “Quenching in oil, blood, or a slave’s body was the secret.” Water, at a controlled temperature. The blood stories are campfire mythology; the oil option is real but modern-practical, not ancient-secret.
- “A cracked blade can be re-quenched good as new.” Re-hardening (saiha) exists as salvage — historically after fires — and is detectable and heavily discounted. The quench is a one-way door; that irreversibility shapes the craft’s entire economy of care.
Check yourself
- Explain why thin clay on the edge cools faster in water than bare steel would. What does this tell you about why the clay recipe matters?
- The smith wants a flamboyant billowing hamon with heavy nie. What must he change about the quench, and why does that specific change raise the odds of losing the blade?
- Walk the causal chain from “martensite has ~4% more volume” to “the finished blade is curved with the edge on the convex side.” Where in that chain could a hagire originate?
- Ashi — the clay ribs across the edge zone — cost nothing and save blades. What exactly do they trade away, and why is that trade nearly always worth it?
- Why does the whole appraisal system treat a re-hardened (saiha) blade as permanently diminished, even when it looks fine?
Apply it
Choose by equipment (~30–60 min). Paper lab: write a one-page failure analysis of a hypothetical quench: the smith’s clay flakes off a thumb-sized patch mid-body during the plunge. Predict the local microstructure, the hamon’s appearance there, the stress consequences, and whether the blade survives — reason from the cooling-rate model, then check your prediction against descriptions of the flaw called mizukage and of tobiyaki (isolated hardening islands). Real lab (only if you already do heat treatment safely): take a small 1084/1095 steel blank, coat the spine with furnace cement or clay, leave the edge zone thin, heat to non-magnetic, quench in warm water, then temper — etch lightly and look for your line. Either version is a direct capstone seed: the failure analysis grows into a review; the test blank into a prototype.